Friday, 20 March 2015

Portrait Photography + Tom Barnes


Portrait photography is when photographs are taken of a person or people instead of being drawn or painted.  They can be shot inside or outside, in a studio or anywhere else.  A fast shutter speed is often used to capture these images to compensate for changes in facial expression or fidgeting.  The practice of taking portraits was popularised with the invention of daguerreotypes - photographs created through a chemical process involving mercury vapour - in 1839 by Louis Daguerre.  This meant that the lower classes could afford to have a picture taken too.

A portrait by Tom Barnes
The National Portrait Gallery in London is dedicated to portraits of people of historical importance to the UK.  It houses more than 250,000 photographs.

An example of a portrait photographer is Tom Barnes, an England-based photographer who works internationally shooting bands, models, animals, and ordinary people.  He has shot for as diverse a range of clients as Rock Sound, Channel Four, Q Magazine, Drop Dead, and Roadrunner Records.  He also shoots people and things he finds interesting for himself, posting them on his website.

Self-taught while doing an urban land economics degree at university, he has been taking photographs since around the age of four.  Now, having spent over £25,000 on his camera equipment, he is a renowned portrait photographer sought out for press, editorial and advertising.  I discovered him originally through his close relationship with the band You Me At Six and by seeing his photographs in publications such as Kerrang!.  I like what he does with his surroundings and light to take engaging photographs.


He shot all the individual
portraits here except
for Oli Sykes. (RS194)
As a photographer, he relies heavily on artificial light over natural.  His signature style uses this lighting to create a sombre effect.  He has an impressive array of photographic techniques and methods and all of his images are engaging and interesting.
An example of Tom Barnes' work

Moreover, he uses his online presence as a way to show his equipment (including his awesome workspace he made himself!), tips and tricks etc.


With portrait photography, the subject(s) can be photographed close up or from a distance.  They are usually shot with either half the body in view or just a head shot.  Portraits are good for school photos, baby pictures, and photographs where you are trying to capture a mood or expression.

Young Guns, by Tom Barnes
This portrait of Daniel Mays is nice because all the colours tie in together, with the brown of the suit and the walls, and the similar colour of the Scrabble tiles and the windows.  I like how it was set up so it seems as if the subject has been interrupted in his game.  The way it includes around half of his 
Daniel Mays (Tom Barnes)
body as well as the surrounding area makes the photo more inclusive, like the viewer is seated opposite him.  The photo has a warm atmosphere and I really like it, along with the rest of Barnes' work.


Sources used:


Smartphone Cameras

Smartphone Cameras

One of the most widely accessible image making methods is the camera found in most people's pockets - the smartphone camera.  Phone manufacturers have now developed smartphones so that all of them carry cameras to rival most point and shoots.  Building on basic camera phones - such as the world's first, the 2000 Japanese J-SH04 created by Sharp, or the slightly earlier Samsung SCH-V200 built-in camera phone (contested as you could only access the photos from a computer) - we have now arrived at phones such as the 16 megapixel, 577ppi, dual LED Samsung Galaxy S6, due to be released in April.
The 2000 J-SH04 camera phone
(Wikipedia)

The 2005 Sony Ericsson K750i
camera phone
(Tech Radar)
The 2015 HTC One M9 smartphone
with Duo camera
(PC Advisor)


The more up to date phones will have both front and rear-facing cameras, allowing for video conferencing and the increasingly popular selfie, albeit with lower resolution front cameras.  The recent rise in "selfie culture" has led to smartphone makers starting to increase the resolution of thesefront cameras. Smartphone cameras differ from cameras as their main function is not to take photographs.  Although camera technology has improved in recent years to include many of the same features as phones - e.g. posting pictures taken to Facebook, Twitter, Instagram etc. using wifi - smartphones are an easier and more flexible way to store and upload images.  It is faster than using a USB cable or SD card to upload pictures to a computer then adding them to your email or social media, and as smartphones can use mobile data they can take and send pictures anywhere as they don't have to be reliant on a broadband signal.

Smartphone camera comparison (Giz Mag)

I have a HTC One X, which has an 8 megapixel camera (1.3 for the front facing one).

Here are some pictures taken with my phone as an example.  I used the different filters available, which include Posterise, Vintage Warm/Cold, Solarise, Negative and Dots.

There is debate as to whether smartphones can take better photographs than most cameras.  Whether or not that is true is generally up to the user, however it can't be denied that smartphones are capable of creating images of the same quality as point and shoots, maybe even some DSLRs.  Which did a test to see the best camera for taking ordinary shots.  A compact camera won, but as they said, the best camera "depends on the type of shots you want to take".


With many apps available to download, or items such as the Nokia Lumia Camera Grip to help make the smartphone camera experience as close to a "real" camera as possible, it's not difficult to see why smartphones are nowadays becoming more prevalent than cameras.  Part of the appeal may the ease in which photographs can set up and taken on the camera application of the phone.  Settings are more intuitive and are located in the same place, making it a more straightforward process.  Even though there are cameras with touch screens, it can't be denied that smartphones, being multi-purpose (with touchscreens), have the added attraction of being more convenient to cart around and pull out when a photo opportunity catches your eye.  

I don't believe that there is a right or wrong side to the smartphone/camera discussion; I use both, and like both.  For different reasons, they are the most useful for different photographs, and therefore I alternate between them depending on the situation.  Smartphones cameras are getting better and better and I'm looking forward to seeing what phone manufacturers do next to increase their ability to compete with camera manufacturers.


Sources used:

Mobiles.co.uk
Wikipedia
The Huffington Post
Tech Radar
Tech Radar II
Digital Trends
BBC News
Phone Arena
Giz Mag
Wikimedia Content (By Morio (photo taken by Morio) [GFDL (http://www.gnu.org/copyleft/fdl.html) or CC-BY-SA-3.0 (http://creativecommons.org/licenses/by-sa/3.0/)], via Wikimedia Commons)
PC Advisor
Which 

Thursday, 5 March 2015

Something Out Of (Remote) Control


Remote Control Photography

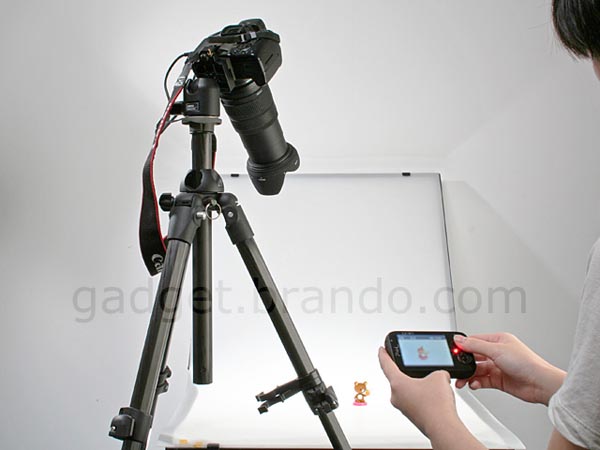
If you, like me,  frequently end up with blurry photos due to your hands shaking as you take the picture, you may decide to look at remotely controlling your camera.  This involves using a remote shutter to take a photo from a distance, with you directing when the camera is triggered.  You could use a tripod to steady the image, although there is still a chance of camera shake when you press the button.  A remote avoids this problem.  However, a tripod can still be used, especially if you are using the remote to take a group portrait.  A remote shutter can take a picture much quicker than when you are taking one normally, which means a faster reaction time and hopefully a picture closer to the one you were aiming for.

Although some digital point and shoot cameras have the capacity for a remote trigger, it is mainly DSLR cameras that have this function.  To find cameras that are able to be triggered remotely, the following website is helpful: http://www.neocamera.com/search_camera.php?remoteinfrared=1&by=feature


Shown above: a camera on a tripod with a wireless remote
(Gadgetsin)

How to Remotely Control Your Digital Camera to Take Better Photos, Create Awesome Timelapse Videos, and More
Canon EOS Utility application on computer (Life Hacker)

There are a couple of types of remote control, namely wired and wireless (infrared or radio frequency).  Wired remotes are controlled through a cable that plugs into the camera, only offering a range as long as the cable.  Included in this category are tetherable cameras such as most Canon DSLRs, which come with the software to control the camera completely through the computer.  Some point and shoots also have this software.


Infrared wireless remotes work with infrared receivers built into or mounted on the camera.  They need a direct line of sight to the camera receiver (preferably not in strong sunlight) and don't have a very long range.  As the receivers are most often at the front of the camera, the remote will need to be triggered from the front.  These remotes are cheap to buy and also make, but have a limited functionality i.e. clicking the shutter with or without a delay.  IR transmitters and receivers - such as the Hama IR remote trigger - are generally used in wildlife or action photography to capture an image without having to be too close.  For these types of photography an auto sensor will be used.  The receivers will be set up so when the subject of the photograph (for example, a runner or a lion) interrupts the beam the shutter will click and take the picture.  This allows a shot of a race winner crossing the line or a close up of a dangerous animal.

Displaying IMAG0732.jpg
My friend's self-proclaimed
"selfie taker" for her iPhone.
It works as a connected Bluetooth
device to set off the camera.
Also wireless are radio frequency remotes, which do the same thing as IR but with a greater range and no need for an unblocked path to the receiver.  They are generally more expensive than the other types of remotes, with some I found on the internet being over $300 (£199).  They will usually have a lot more features, such as being able to toggle between single shot and continuous shooting.

One particular contemporary photographer who uses remote photography is live music and band photographer Adam Elmakias.  Among his live gear is his Canon 5D Mark III, which he arranges so that every time he presses the shutter, remote cameras take a picture at the same time. Below is an example of a picture taken simultaneously by his remote camera as he photographs the crowd from the drum riser.  He is also a user of PocketWizard wireless triggers and GoPro cameras presumably with their GoPro wifi remotes, which operate on a radio frequency.

 
All Time Low, London 2014 by Adam Elmakias

From the first demonstration of a wireless remote control by Nikola Tesla in 1898, the technology and ability of remote controls has vastly improved, from TV to air conditioning to "universal remotes" to the simple or wildly accessorised camera remote.  Personally I think these camera remote controls are a brilliant tool to widen the appeal of photography and enrich the variety of images that can be taken.  They enable photographs possible that wouldn't have been taken otherwise, whether it's a group shot or an up close and personal picture of a tiger.  I got the opportunity to see a camera remote in action (my friend Rebecca's) and I was really impressed.  I think it's so cool that technology has evolved enough to be able to manipulate cameras and smartphones from a distance.  One day I may also decide to buy a camera remote to take my own distance photographs (well, I feel I know enough about them by now!).


Sources used:

She's No Good With Words

While I was updating this blog, I realised that I had really bad titles for all my posts.  So now I've changed them (they're mostly song lyrics) and I feel better about posting stuff with titles other than "Tree".

I'm also finding it really hard to post my drafts.  Every time I go to publish I always find something that needs to be edited.  Sometime I will!

Friday, 5 December 2014

Sam


Sam McTrusty, the lead singer of Twin Atlantic, probably wouldn't consider this a good picture of himself, but since this was the best picture I got at the concert I thought it would be interesting to edit.


Twin Atlantic announced their Great Divide tour earlier this year, with a stop at the Glasgow Barrowlands on the 24th of October.  That quickly sold out and they released another Glasgow date on the next day, which also sold out.  Somewhere along the way my friend got tickets for us, her parents and our other friend.  It was a really great concert (apart from the fights in the mosh pit, I had a massive bruise on my foot for a week) and we even met the first support, Nothing But Thieves, after the show.  I wasn't too keen on the venue but I did get a nice picture of the stars on the ceiling.


With this photo I used iPhoto to move the mid tone and white point sliders to the maximum, and the black point to 42%.  The saturation I increased to 100%, and I also altered the definition.  I changed the tone to green because I liked how the guitar looks and contrasts with the darker areas of the picture.

I did a digital pop art project with the youth club a few years ago, which I really enjoyed. In that case we used Photoshop on ancient Macs but I still really like having the ability through other methods to make photographs completely different.  Digital pop art is very interesting and I like the effect it has.  Most of the time though I think I just like making things looking unreal.


I liked the photo better in black and white, but I still wanted to edit it some more so in Windows Live Photo Gallery I added an orange filter, sharpened the image to make it more defined and increased the brightness and tone.  I also made the contrast darker so the light of the guitar stood out even more.  I like how the lightest parts of the picture are slightly fuzzy because I think it has an interesting effect and complements the photo as a whole.


I used iPhoto for this one, boosting it and making the temperature and tone -100.  I increased the colour intensity, avoiding saturating skin tones.  I altered the exposure very slightly, making the picture brighter.  I also decreased the mid tones and the white of the photo to 50% and increased the black points to 20%.
Here is the original photograph, which was not a calculated shot but is closer to a snapshot, since I was desperately taking photos to try to get a good one.  The ISO was 400, and the aperture f/6.1.  The shutter speed was 1/4.  This wasn't by design as I left the camera in automatic mode, mostly so I didn't have to spend a lot of time fiddling about and missing the show.


I had a lot of fun editing these photos and I really like the different results I got.  I think I prefer the blue and pink one over the rest because I like the contrast and how the bright colours go together.